
The Realtor's Complete Guide to Email Marketing

In our previous article on real estate drip marketing campaigns, we outlined the structure and content you need in your drip marketing efforts.
Here, we go back to basics by going through the actual mechanics of how to do this. If you’ve ever wondered, “where do I get started setting up a real estate email campaign”, or wanted step-by-step instructions on how to do drip marketing, this guide is for you. We’ll cover these topics…
Why use e-mail marketing software?
Syncing your real estate CRM with Mailchimp
Setting up One-Off automatic emails
Setting up email drip campaigns
Do your emails always need to be automated?
Why use e-mail marketing software?
As a Realtor you need both a way to manage your contact database, and an e-mail marketing tool to send them your newsletters, real estate drip marketing campaigns, and one-off mass emails.
There are all-in-one solutions out there that roll email marketing up with other offerings such as a CRM, website, and other services. These are generally not recommended. These all-in-one solutions typically excel at one thing, such as email marketing. Once you start to use their other offerings, you’ll find that the other services are not actually robust enough to meet your day-to-day needs. Instead, we recommend using standalone tools that excel at what they do, and then integrating them with each other to enjoy that same level of productivity that an all-in-one tool promises in theory.
That’s why for this guide we show you how Realtors can leverage one of the best email marketing tools offered (Mailchimp) to meet all of their real estate email marketing needs.
Syncing your real estate CRM with Mailchimp
By syncing your customer relationship management system with Mailchimp, any new contacts that are added into your database will automatically be added to your Mailchimp account.
It doesn’t matter if you manually input that client or they come into your CRM via lead capture. Either way, they’ll get pushed to your Mailchimp account.
To set this up, first you need to create an API key within Mailchimp:
Log in to your Mailchimp account. Or, if you don’t have an account yet then click “Create an account”.
Click on the icon in the bottom left.
From this menu click on “account”.

From the account settings page, click on the “Extras” button, then select “API keys” from the drop down menu.

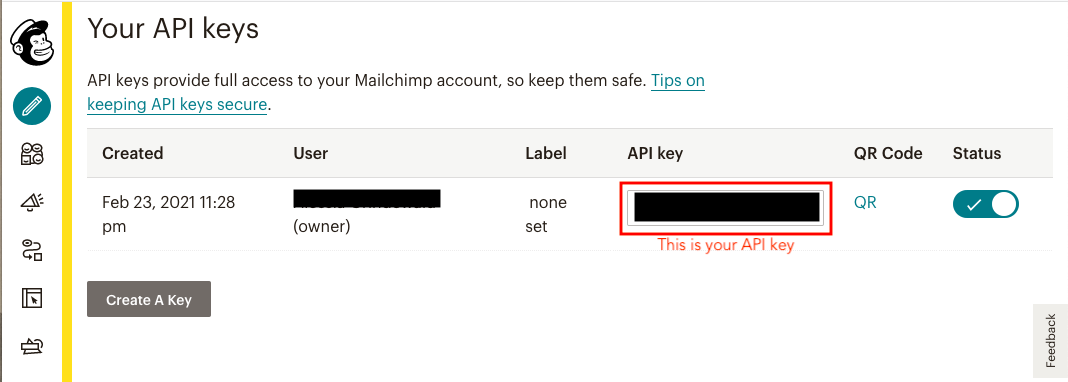
This takes you to a new page. Scroll mid-way down the page to a section called “Your API keys”. From here,click on the “Create A Key” button.

You’ve now generated a unique API key. Once you input this into your real estate CRM, it will connect this Mailchimp account to your CRM. Treat this code like a password or pin number.
Take Note: Before you sync your Real Estate CRM with Mailchimp
If you’re using a pre-existing Mailchimp account, first review any rules or automations that you previously set up. These could impact the users you’re about to sync over.
Example: If you have a welcome email trigger set up to automatically send an email to new subscribers, that email will be sent to all of your contacts when you sync. This is because your whole list will be considered as “new subscribers” by Mailchimp.

Setting up a real estate CRM integration with email automation software.
Completing the sync
Once you’ve removed any pre-existing automations, enter the API key into your real estate CRM. (Instructions on using your Mailchimp API key with RealOffice360.)
Troubleshooting: Why don’t I see all of my CRM contacts in my Mailchimp audience?
When you sync your contact database over, it’s pretty common to notice a discrepancy between the number of contacts in your real estate database versus your Mailchimp audience. There are a few reasons why this is happening:
Missing email address
If your contact’s profile doesn’t include an email address, it won’t sync to Mailchimp. So if you have contacts that just have a phone number and address they will not appear in your audience.
The email seems like spam
Mailchimp will flag spammy looking emails and simply not sync them. For instance if I tried syncing over a contact with the email address person@example.com it’s going to be flagged as a fake address.
Generic email address
Check if your contact’s email is a generic one such as info@companyname.com instead of their specific email address. Generic emails will also not be synced over.
They’ve unsubscribed from you in the past
This primarily applies if you’re using a pre-existing Mailchimp account. If they’ve already unsubscribed from you, you’ll see an unsubscribed badge next to their name and they won’t receive any of your marketing emails. In accordance to laws including CAN-SPAM, CASL, and others, the only way to change this is to have them resubscribe following one these methods.
If you haven’t used an email marketing tool in the past, you may notice a high number of unsubscribes on your first email. This is from contacts in your database that don’t wish to receive ongoing notifications. In these instances it is recommended that you respect their wishes and stay in contact solely via phone check-ins and mailers until they’re ready to opt back in.
Takeaway:
Only contact profiles containing a valid email address that belongs to an individual will be synced over. If they are missing an email, it seems fake, or is too generic, you won’t see that contact in your Mailchimp audience. If they’ve unsubscribed in the past then that client will not receive your email marketing and you should use another method to stay in touch.
Getting Organized
Now that you have your real estate contacts in Mailchimp, let’s look at how they’re organized:
Audience
Your audience is your overall client database. All of your real estate contacts will be imported as a single audience. From there you set up tags or segments to divvy your contacts up and send them targeted emails and drip campaigns aimed at their specific tag or segment. You don’t need to purchase more than 1 audience to do this.
The exception to this is if you work in several lines of business. For example, if you sold both residential and commercial real estate. In this case it’s better to treat those contacts as separate databases, which translates into separate audiences within Mailchimp.
Takeaway:
You do not need to have more than 1 audience to manage your email marketing, even if there are emails you only want going to specific groups and not to everyone.
Segments
Think of segments as search filters. The segments use conditions that you can set to filter your audience into different groups of contacts. These segments (or search filters) can be saved so that each time you add a contact into your real estate CRM, their information will cascade through to get them on the correct mailing list.
Example:
I have a new listing email I want to send. Let’s say I have a Prospective Buyers group in my CRM. I can now log into Mailchimp, go to the Prospective Buyers segment, and send a one-off email with the listing to my contacts that are interested in purchasing property.
Tags
Tags give you more data, and are useful for adding in more at-a-glance context. (ex. open house, warm lead, referral source). The tags can be used to filter your contacts segment to help you send very targeted emails.
In the new listing email example, if I wanted to specifically send this new listing to the Prospective Buyers that are warm leads, I could use a “warm leads” tag. I would create and add this tag to the appropriate contacts. I would then use this tag to further refine my overall Prospective Buyers segment. If this is a group I want to reach out to regularly or set up automation for, I can save it as new segment called “Warm Prospective Buyers”.
While this requires more manual work on your part, the benefit of this approach is that it allows you to be really flexible in the emails you send out. For instance if someone gets back to me that they’re no longer looking to buy imminently, I can take the “warm leads” tag off so they won’t be filtered on to my “Warm Prospective Buyers” list anymore. They’ll still stay on my general prospective buyers list so they can keep getting those (less frequent) emails. This way I can avoid spamming them and getting an unsubscribe, while still staying top of mind with periodic outreach.
Takeaway:
Segments and tags work together to filter the precise group of clients you want to communicate with. These settings can be saved for future use and automations.
How are my CRM groups imported into Mailchimp?
Depending on the CRM you use, your contacts will be imported with the tags or groups associated with their profile.
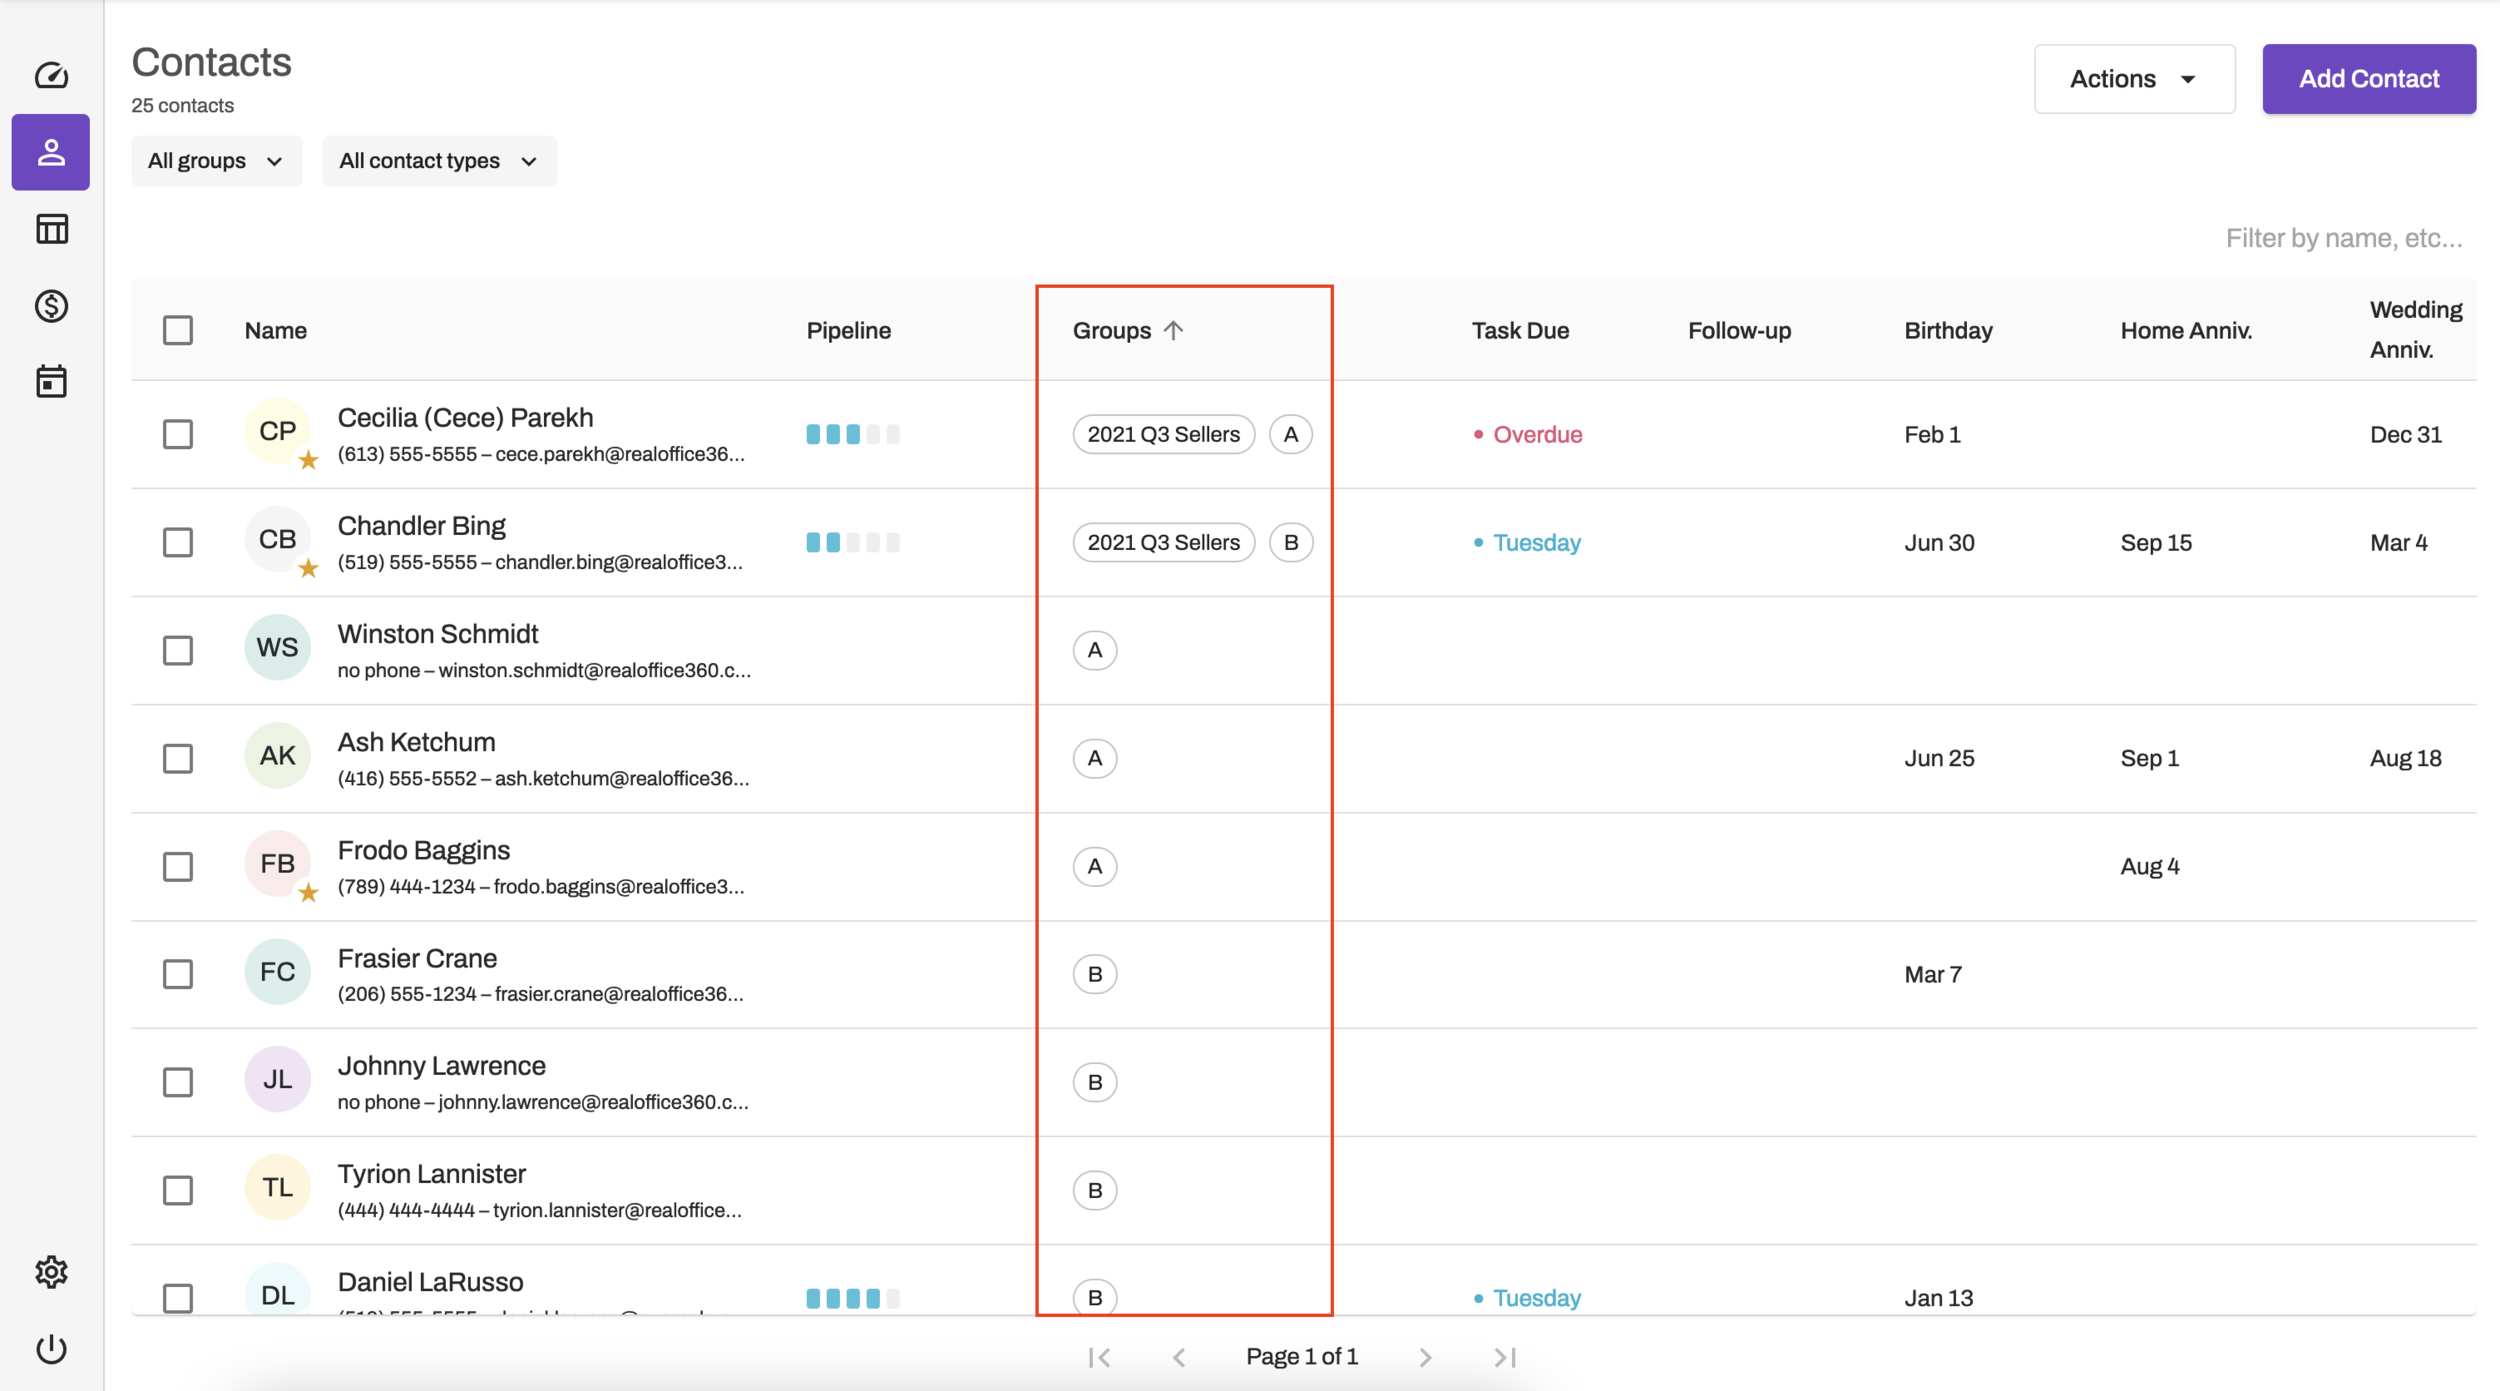
Managing Mailchimp tagging and grouping from a CRM.
In RealOffice360 we use groups, which are imported into Mailchimp. In order to view and send to your groups, you need to go through a one-time set up process to save them as segments. Once you’ve saved your segment filters, any new contacts that you add into a group in RealOffice360 will automatically be added to that segment going forward.
For users of other real estate CRMs we recommend checking with your support team to confirm how your data is imported.
Creating Segments

To create a segment:
1. Choose the “Audience” icon from the left-hand side bar.
This will give you a menu of additional options.
2. From this list, choose “Segments”.
You’ll be taken to a page that looks like this:
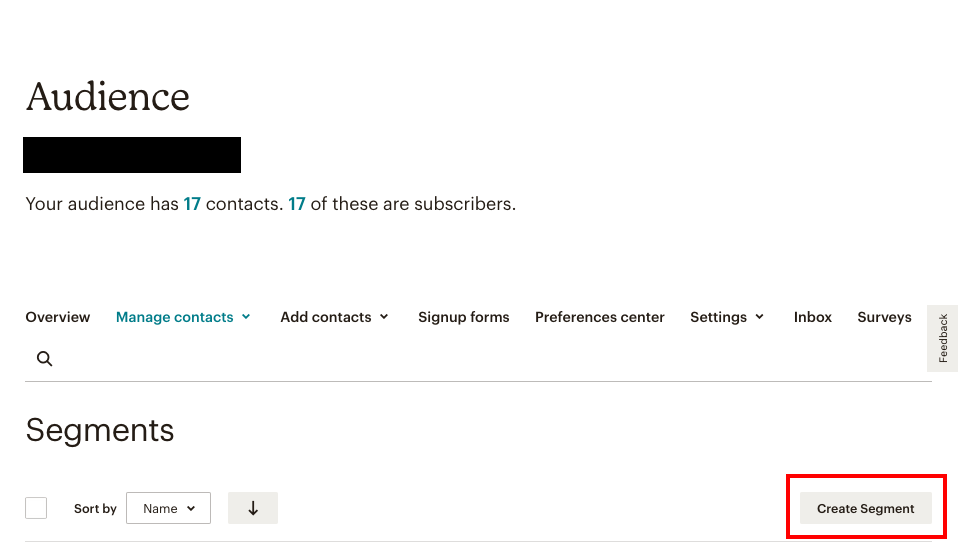
3. Click on “Create Segment”, and the window will update to show you segment customization options:
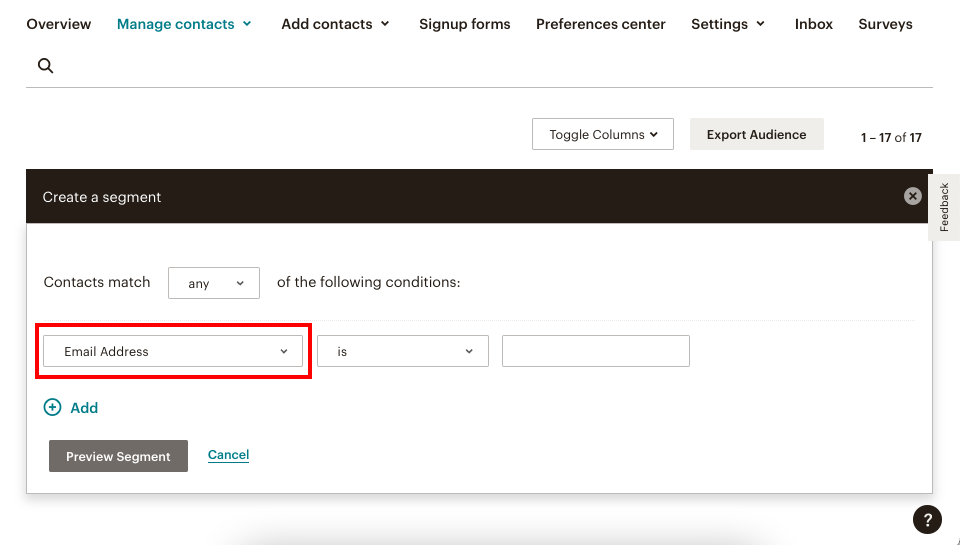
4. Click on where it says “email address” to access a dropdown menu of fields you can use to filter your segment.

5. RealOffice360 users will see the options “Groups”. Choose this.
[If you use a different CRM, this menu may look different for you, but the remaining steps will be the same.]
6. You will see the full list of groups you have in RealOffice360. Choose one (in this example I’ve chosen my “a” target list).

7. Click on “Preview Segment”.
You’re taken to a screen with all of the contacts in your chosen group.

8. Click “Save Segment”, and this is now saved to your Mailchimp account.
Note:
Once you save a segment, any new contacts that match the conditions you set will automatically filter into it. This means that any future contacts you add to your group in RealOffice360 will be pushed to the matching saved segment in Mailchimp.
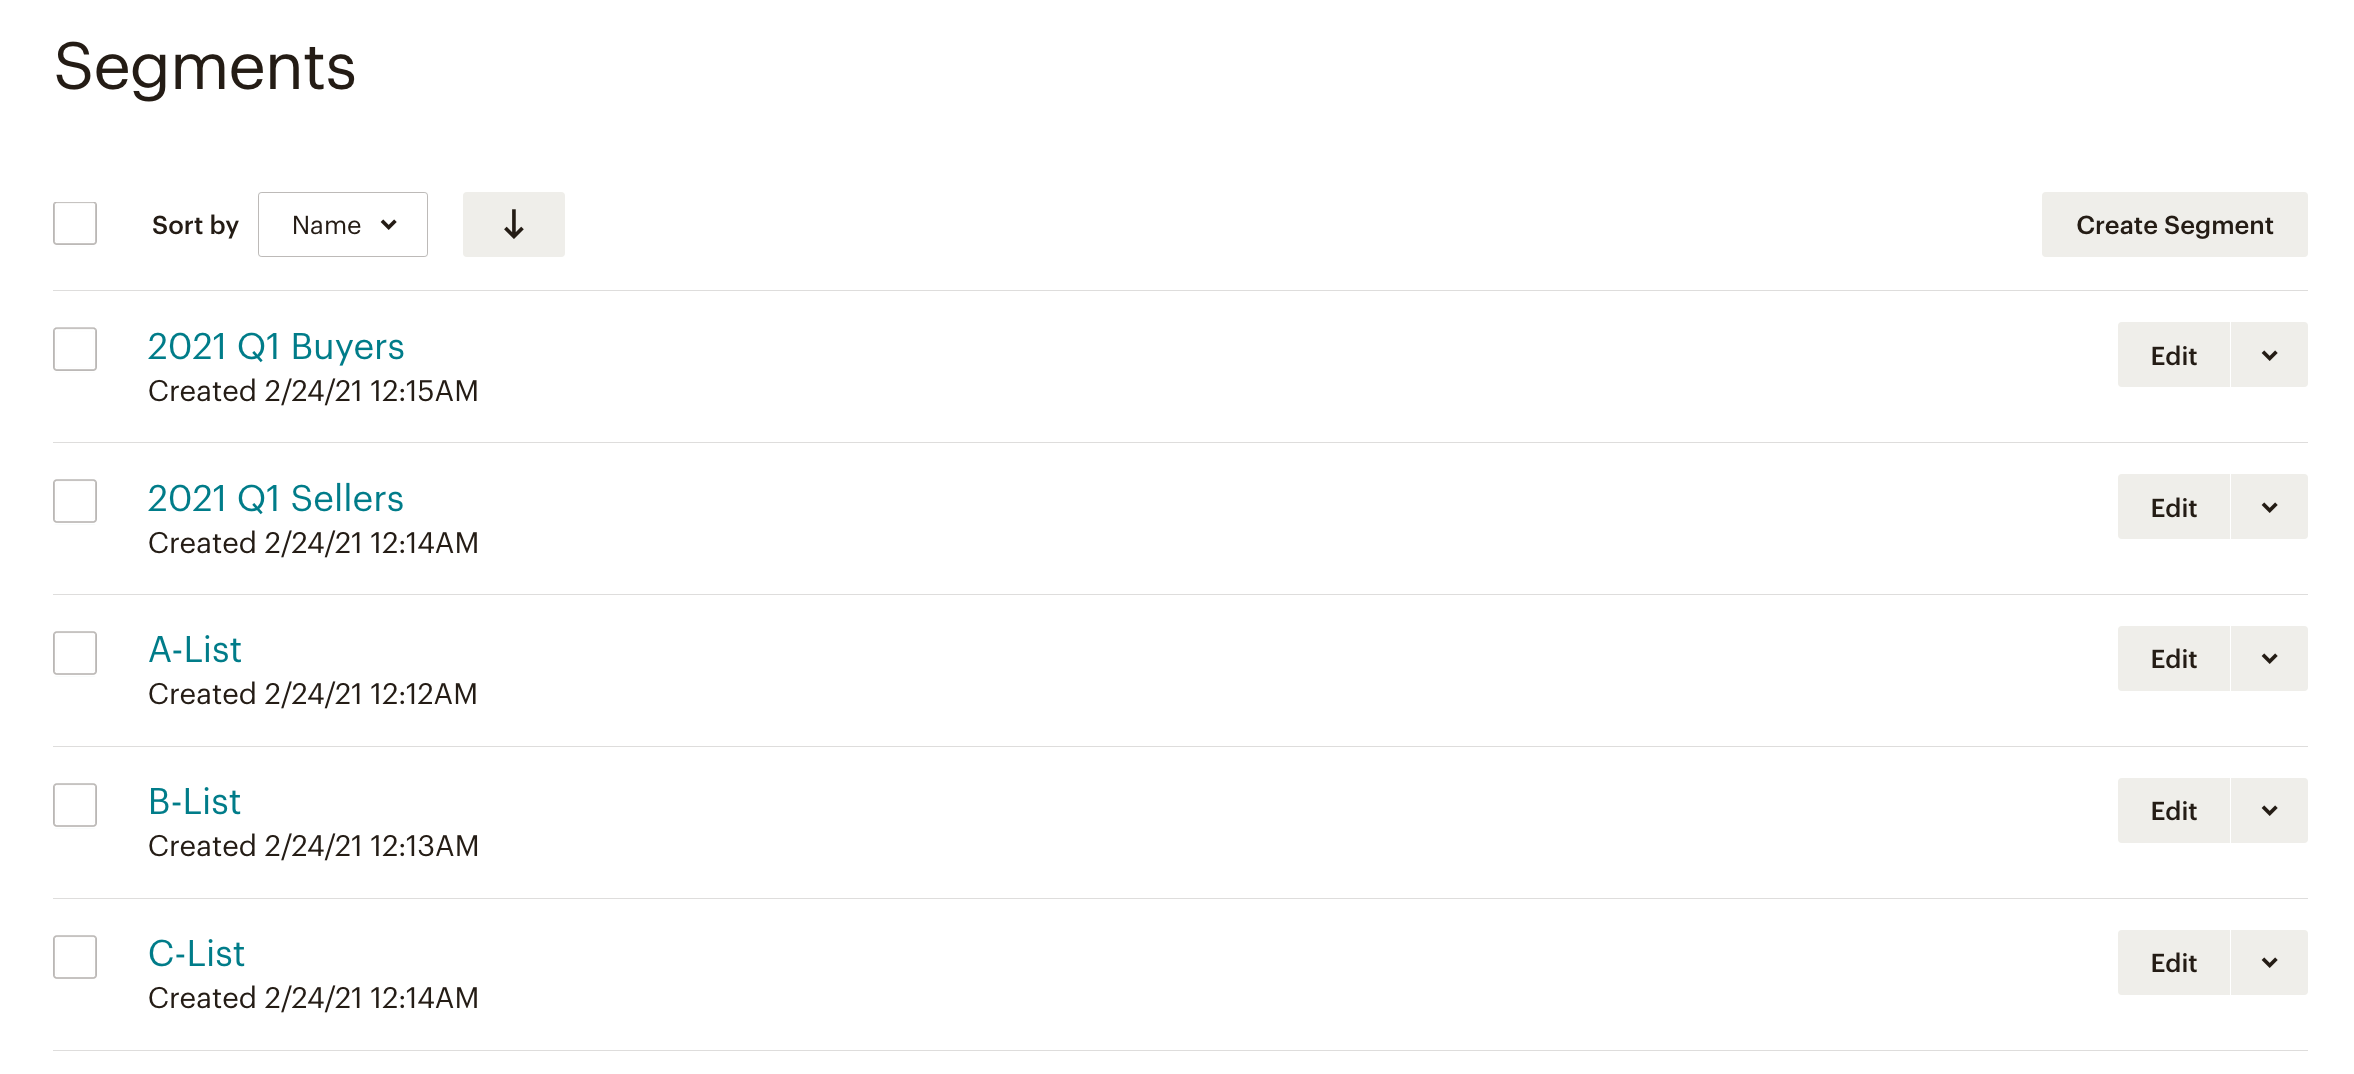
Repeat the steps in this section for all of the groups you want to set up as email lists. When this is done, if you go to Audience -> Segments in the future, you’ll see your CRM groups populated there:
Sending a one-time automatic email
Now that you’ve organized your contacts, it’s time to set up some automatic emails! One-time automatic emails can be set up on Mailchimp’s free plan.
In this example we’ll go through how to set up an automatic “Happy Birthday” message for your clients. If your contact’s birthday information is input into RealOffice360, this information will be synced over to Mailchimp. If you use a different CRM, ask your support team whether the birthday merge field was synced.
Getting Started

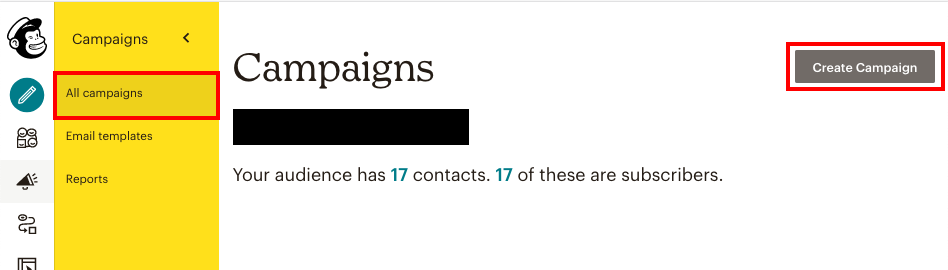
1. Choose the “Campaigns” icon from the left-hand side bar. This will give you a menu of additional options.
2. From this list, choose “All campaigns”.
You’ll be taken to your email campaigns page.
3. Click on the “Create Campaign” button in the top right.
You will see a pop-up with different campaign types to choose from:

4. Click on “Email” and you’re taken through a wizard with a series of set-up options:

5. Choose “Automated”.
6. Click on “Say ‘happy birthday’”.
You’ll now be taken to the next screen:

7. Ensure “Single email” is selected.
8. Name your campaign and if you have more than one audience, make sure it points to the correct one.
9. Click “Begin”.
Design your email

10. Click on “design email”.
11. On the next screen, set up your campaign by entering basic information, including:
Internal title you’re giving the campaign,
Email subject,
Preview text,
From name (for better conversion, we recommend using your name rather than your brokerage’s), and
Email address.

12. Once you’ve entered in the relevant information, Click “Next Step: Template” in the bottom right.
Select a template
13. You can choose a theme and change out the colours and text to match your branding, or choose a layout and build your email.
14. Customize your email. Here, we chose the simple text option and added in an image block. We then used the image block to insert a gif into the message.

Note:
While there are a lot of detailed birthday email templates out there, for Realtors’ follow-up purposes we recommend keeping things fairly simple. The goal here is to stay top-of-mind and maintain your relationships with your sphere of influence. You’re typically not trying to share a birthday discount or similar call-to-action, which is what most pre-existing templates are designed to do.
15. Once you’re happy with the email’s design, click “Save and Continue” in the bottom right. You will be taken back to this screen:

Customize email settings
Trigger
This is when your email will be sent. For birthday emails we recommend changing the default trigger from “1 day before Birthday” to the day of. You can change this by clicking on the blue “edit” button.
Schedule
Everyday at 9am means that the system will check every day whether it is someone in your audience’s birthday. If that is the case, then it will send an email to them at 9am. You can change the timing by clicking the blue “Edit” button.
Filter by segment or tag:
By default this email will send to your entire audience. If you only want to set it up for particular client groups, click “Add” and choose the segment associated with that client group.
Post-send action:
You can choose to create another group that will list your clients who have received this email. This could be useful if you wanted to do follow-up calls, for example.
17. Once you’ve made your changes, click “Next” in the bottom right to review your workflow:
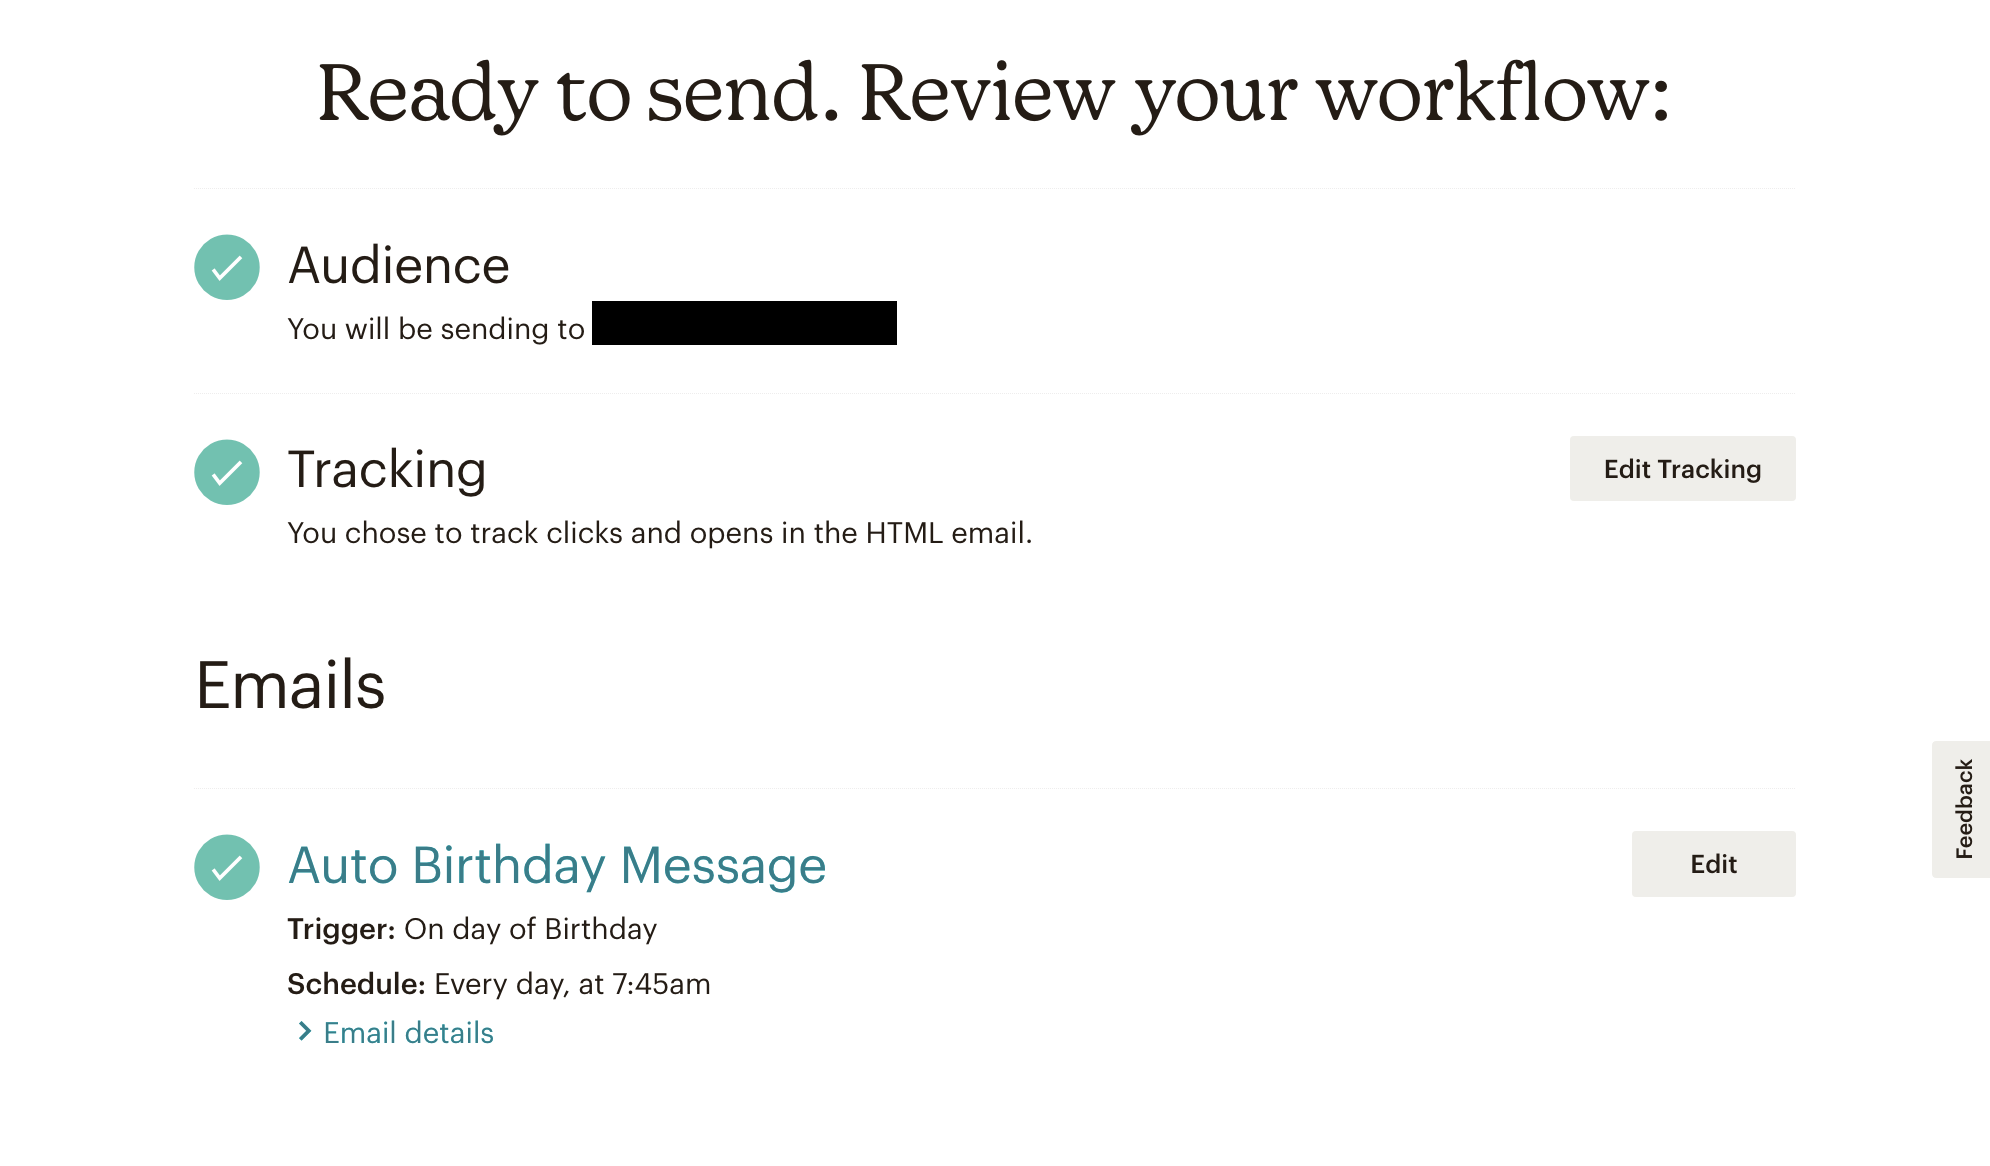
18. If everything looks good click “Start Sending” in the bottom left-hand corner. (Otherwise, click “edit” to go back through the process and make any necessary changes.)
19. Once you click “Start Sending”, you’ll see a “Start Automation Workflow” pop-up. Click “Start Sending”.

Voila! Your one-off automatic email has been set up.
One-time automatic emails can be used for birthdays, home anniversaries, annual free CMA reminders, and any other email that’s part of the follow-up system you use to stay in touch with your sphere of influence.
Setting up an email drip campaign
Note: this functionality requires a paid plan on Mailchimp to use.
Before you get start setting up your email drips, you need to craft your overall real estate drip marketing campaign. This means thinking through how each follow-up email you send will re-iterate and build on the previous email to drive the intended result.
In this example, we walk you through the most critical email drip campaign every Realtor should have: a new leads campaign. We’re using our tried and true real estate lead templates as our guide on how this campaign should flow.
The prospect of setting up a drip campaign may feel daunting, but the steps are largely the same as the ones required for setting up a single automated email. Once you get the hang of creating campaigns it will become second nature.
Getting Started
1. Choose the “Campaigns” icon from the left-hand side bar. This will give you a menu of additional options.

2. From this list, choose “All campaigns”. You’ll be taken to your email campaigns page.
3. Click on the “Create Campaign” button in the top right. You will see a pop-up with different campaign types to choose from:

4. Click on “Email” and you’re taken through a wizard with a series of set-up options.

5. Choose “Automated” from the options in the top header.
6. Next, select the email type that best suits your drip campaign. For new leads, choose “Welcome new subscribers”.

7. Choose “Onboarding series” from the options in the header. [If you wanted to send a one-off email to new leads you would select “Single email” from this screen.]
8. Name your campaign.
9. Choose an audience.
10. Click “Begin”.
You’re now taken to a page where you can see a series of emails for you to customize.
Design your email
You’ll be familiar with this page from your past Mailchimp campaigns. The only differentiator is that instead of having a single email displaying here, you can now see a series of them. When you approach this set-up with an email campaign already thought out, it’s a straightforward matter of choosing the layout that best highlights each email, and inputting that information in.

11. Click “Design Email” on the first email of the series.
12. On the next screen, set up your campaign by entering basic information, including:
Internal title you’re giving the campaign,
Email subject,
Preview text,
From name (for better conversion, we recommend using your name rather than your brokerage’s), and
Email address.

13. Once you’ve entered in the relevant information, Click “Next Step: Template” in the bottom right.
Select a template
14. You can choose a theme and change out the colours and text to match your branding, or choose a layout and build your email.
The message of our first new leads email is fairly simple. The North American Association of Realtors’ data tells us that the vast majority of buyers and sellers work with the first Realtor they contact. Based on this, our first new leads email has the goal of getting that client booked in to talk about their real estate must-haves with us ASAP. To that end, we chose a simple text layout.
Customize your email
The simple text layout is comprised of two blocks.
15. If you hover in the top right of a box, you’ll see the option to edit, duplicate, or delete that particular block.

In this example, we clicked edit, and replaced the default text with the email template for general real estate inquiries. (If you work primarily as a buyer’s or seller’s agent, you can find buy and sell-specific templates in that post as well.)
16. To include a market report link for your lead, highlight the text that you want to use for the link. Next, select the link icon.

17. Paste the URL for the market report.
18. Click Insert.

Note: If your market report isn’t on a website, you can insert a file into the email instead:

Where it says “Link to”, click on “Web address”, and choose “File” from the dropdown menu. This will take you to your Mailchimp content studio.
Click “Upload” in the top right, and choose your market report. This will now be uploaded to Mailchimp. You’ll be taken back to the “Insert or Edit Link” screen, and this time instead of a web address, you’ll see “File URL” with a link to your report.
Click “Insert”.
19. Once you’re done editing a block, click “Save and close” in the bottom left, and continue with editing subsequent blocks in your email. Once you’re done with your overall email, select “Save and Continue”. You’ll now be taken back to your email drip campaign page.
Repeat steps 11-19 for each email in your drip.
For this drip campaign we’re going to send three emails. Since the onboarding series auto populated five, we’re going to delete the last two by scrolling all the way down, then:
20. Click the dropdown menu beside the “Design Email” button.

21. Click “Delete Email”.
22. Confirm you want to delete this email by typing DELETE in the text field, then clicking “Delete”.
If you’d prefer to add more emails to your drip, click the blue “Add Another Email”, and a new email will pop up ready for you to design.
Once you’re done designing your real estate drip marketing campaign, it’s time to customize the settings.
First Email Settings
Trigger
Immediately after subscribed contacts join your audience
As soon as your lead capture syncs into your CRM, this contact will push to your Mailchimp audience, triggering this email sequence. However, this email sequence will also be triggered if you were to add a contact manually into your CRM. The manually added contact would still be considered a “new subscriber”.
To deal with this, first add your new leads to a group within your CRM. Then:

Click the blue “Edit” button next to the Trigger setting.
Now click the blue “Change trigger” button

Select the “Audience management” heading
Click “Joins group”
From the “Settings” dropdown, choose your new leads group name.
Click “Update Trigger” in the top right.
Note:
The downside of this approach is that your email won’t be sent immediately when a new lead submits their information to you. Instead that initial email will depend on when you or your assistant are able to go into your CRM and apply the group to your new leads.
Schedule
Every day, all day
This means an email will be triggered as soon as a contact meets the trigger conditions (whether that be at 3am or 3pm). We recommend keeping this setting as-is. You can edit this to only send emails at a specific time of day if preferred.
Filter by segment or tag
None.
Post-send action
You can choose to add or remove the contact from a Mailchimp group or tag. We recommend adding a tag (If you add them to a group, the contact may have their existing group removed). Using tags in this manner can give you an at-a-glance overview of who has been contacted when you look at your Mailchimp audience. This also opens up the opportunity for segments you can use in future campaigns. To add a tag:

Click the blue “Add” button next to the Post-send action setting.
Click the “Choose post-send action” checkbox.
From the “Update merge field” dropdown menu, choose “Add tag”.
Click “Update Action”.
Subsequent email settings
Repeat the above customization settings for each email in your drip campaign.
The follow-up emails are automatically set to send one day after the previous email. This is fine for your second email, but you will likely want to space out your remaining drips (ex. change the third email to send three days after the second email).
Taking contacts off the drip
Situations arise where you may want a client to no longer get your email campaign.
For instance: you talk to a highly motivated client that wants to move on a property quickly. They sign a buyer’s agreement in record time. They don’t need to be included in this particular campaign going forward. You could manually track this and unsubscribe them, or you could take advantage of the filtering by segment. You could assign a “contract signed” or similar group to these clients in your CRM to represent that they are no longer a new lead.
Then, on all of the follow-up emails in your Mailchimp campaign you would change the “Filter by segment or tag” as follows:

Click the blue “Add” button
Click the “Choose segment or tag” checkbox
Choose the “Contacts match the following conditions” radio button

From the “Email Address” dropdown menu, choose your “contract signed” (or whatever you named it) group
Change “one of” to “none of”
Save segment
This step will need to be repeated for all of your follow-up emails.
Once your settings have been customized, click the blue “Next” button in the bottom left.
On the next screen, review your campaign details. Once you’re satisfied, click “Start Sending”.
You’re all set! You’ve now successfully set up a drip marketing campaign.
Do your emails always need to be drip campaigns?
No. Automations work best for:
Sending emails based on subscriber characteristics (such as birthdays)
Sending emails based on subscriber activity (such as sending someone a new leads drip campaign when they’re first added to your database)
Sending emails based on transactional activity (think eCommerce here – such as after someone made a purchase from an online store)
In some instances, pre-scheduling a regular email is going to be a lot simpler than trying to set it up as an automation. A great example of this is when you’re setting up a campaign to stay in touch with your sphere of influence each quarter. Since you want to send them at specific times of the year, these emails don’t neatly fit into the automation categories above. Rather than figuring out complex triggers to get these emails to drip out when you want them to, you can set them up as pre-scheduled single email campaigns for the same effect. Mailchimp allows you to schedule your emails years in advance.
Scheduled emails: quarterly sphere of influence example
Note: the schedule feature is only available on paid plans
For this example, we’re going to show you how to implement the quarterly real estate email templates for staying in touch with your sphere of influence all year round.
Why is an automation not the best choice here?
Automations work well when you’re using contact-specific information to trigger your email to send. When you’re sending quarterly emails, these are designed around particular dates rather than based on your client’s characteristics or actions they have taken.

1. Choose the “Campaigns” icon from the left-hand side bar. This will give you a menu of additional options.
2. From this list, choose “All campaigns”.
You’ll be taken to your email campaigns page.
3. Click on the “Create Campaign” button in the top right.
You will see a pop-up with different campaign types to choose from:
4. Click on “Email” and you’re taken through a wizard with a series of set-up options.
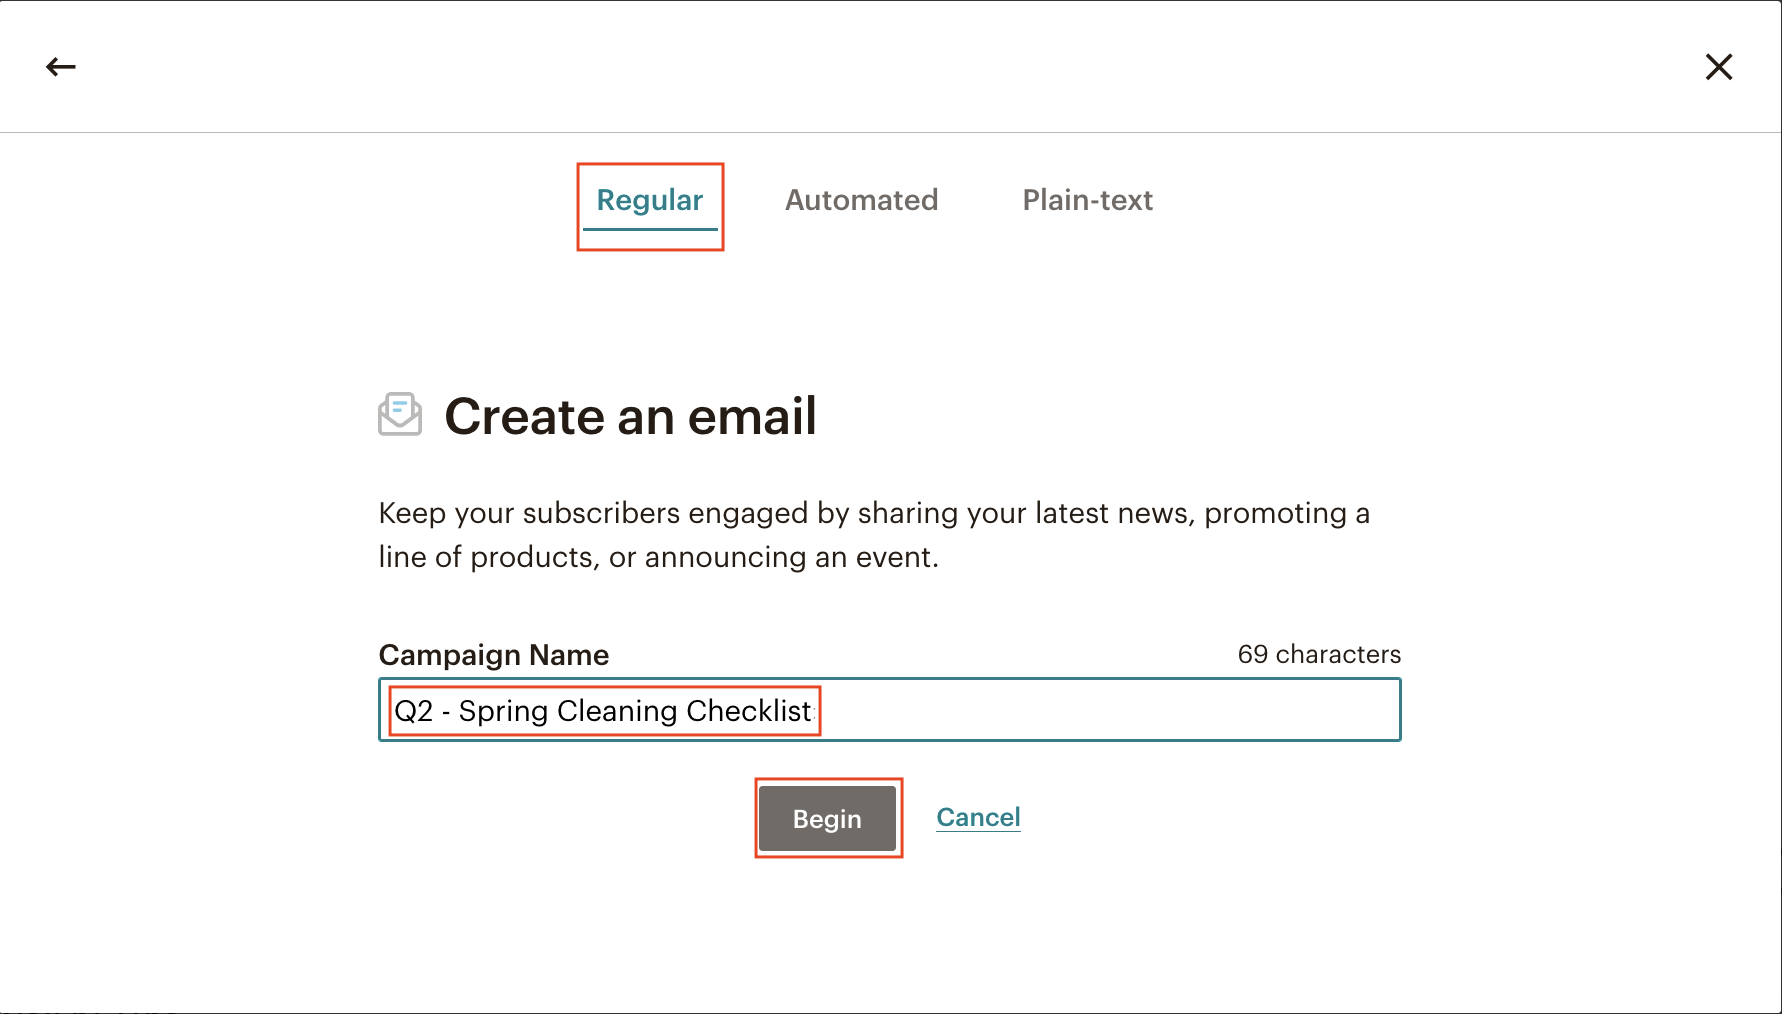
5. Make sure the “Regular” tab is selected, and name your campaign.
6. Click “Begin”.

7. Select “Add Recipients”.
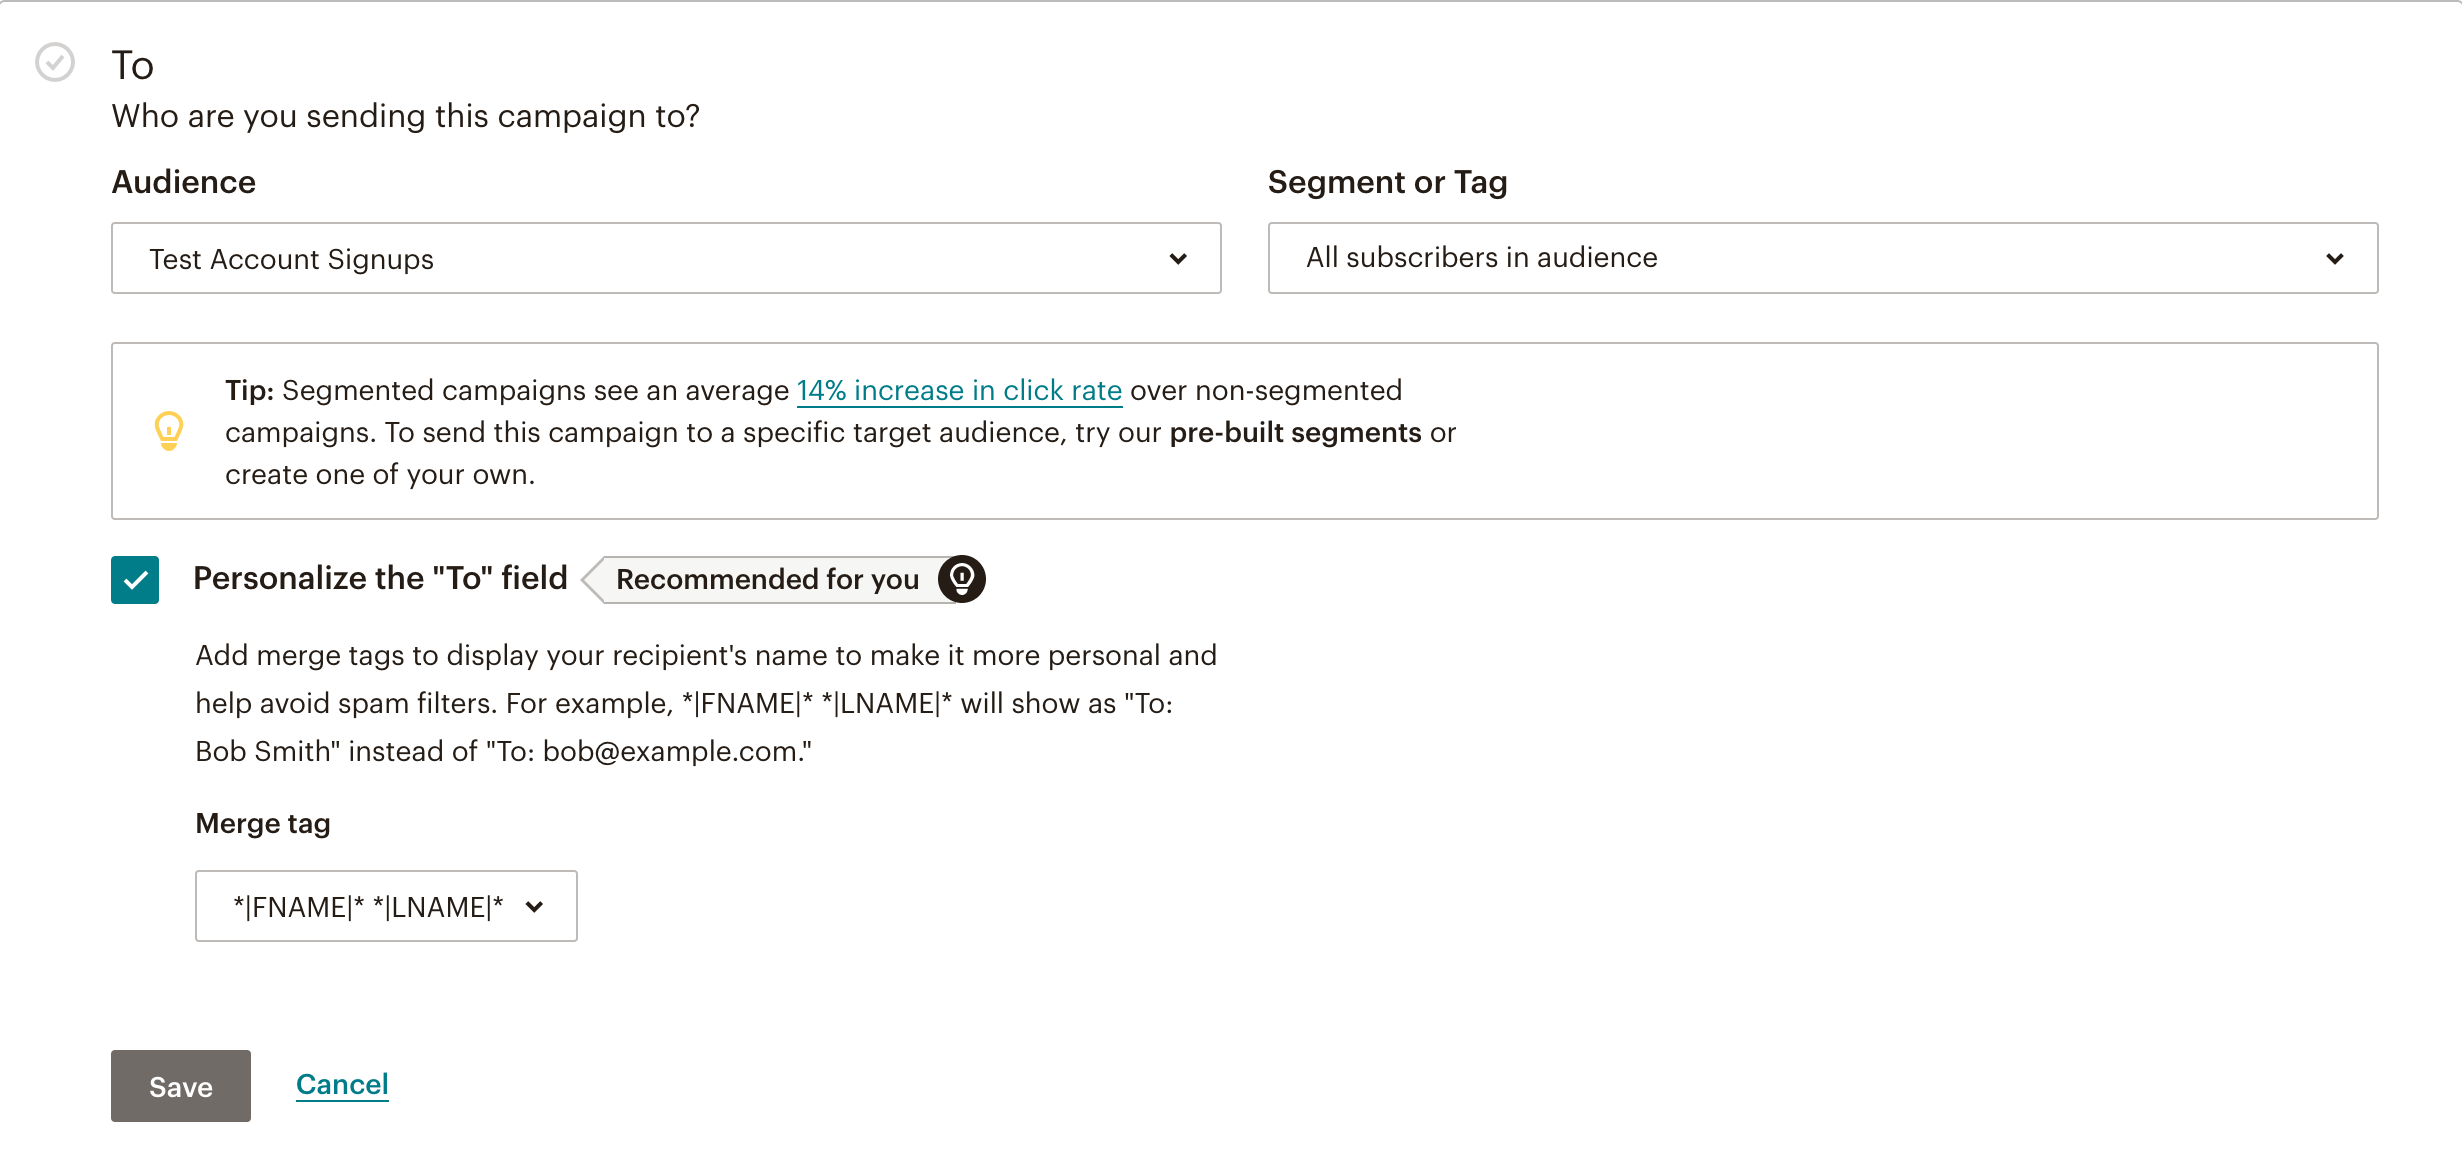
8. Choose the audience for your email. You can send it to your entire audience, segments, or tags.
9. Select the “Personalise the “To” field” checkbox.
10. From the Merge tag dropdown, select “*|FNAME|* *|LNAME|*”.
11. Click Save.
12. Click “Add From”.

13. Type in your name and email address.
14. Click “Save”.
15. Select “Add subject”.
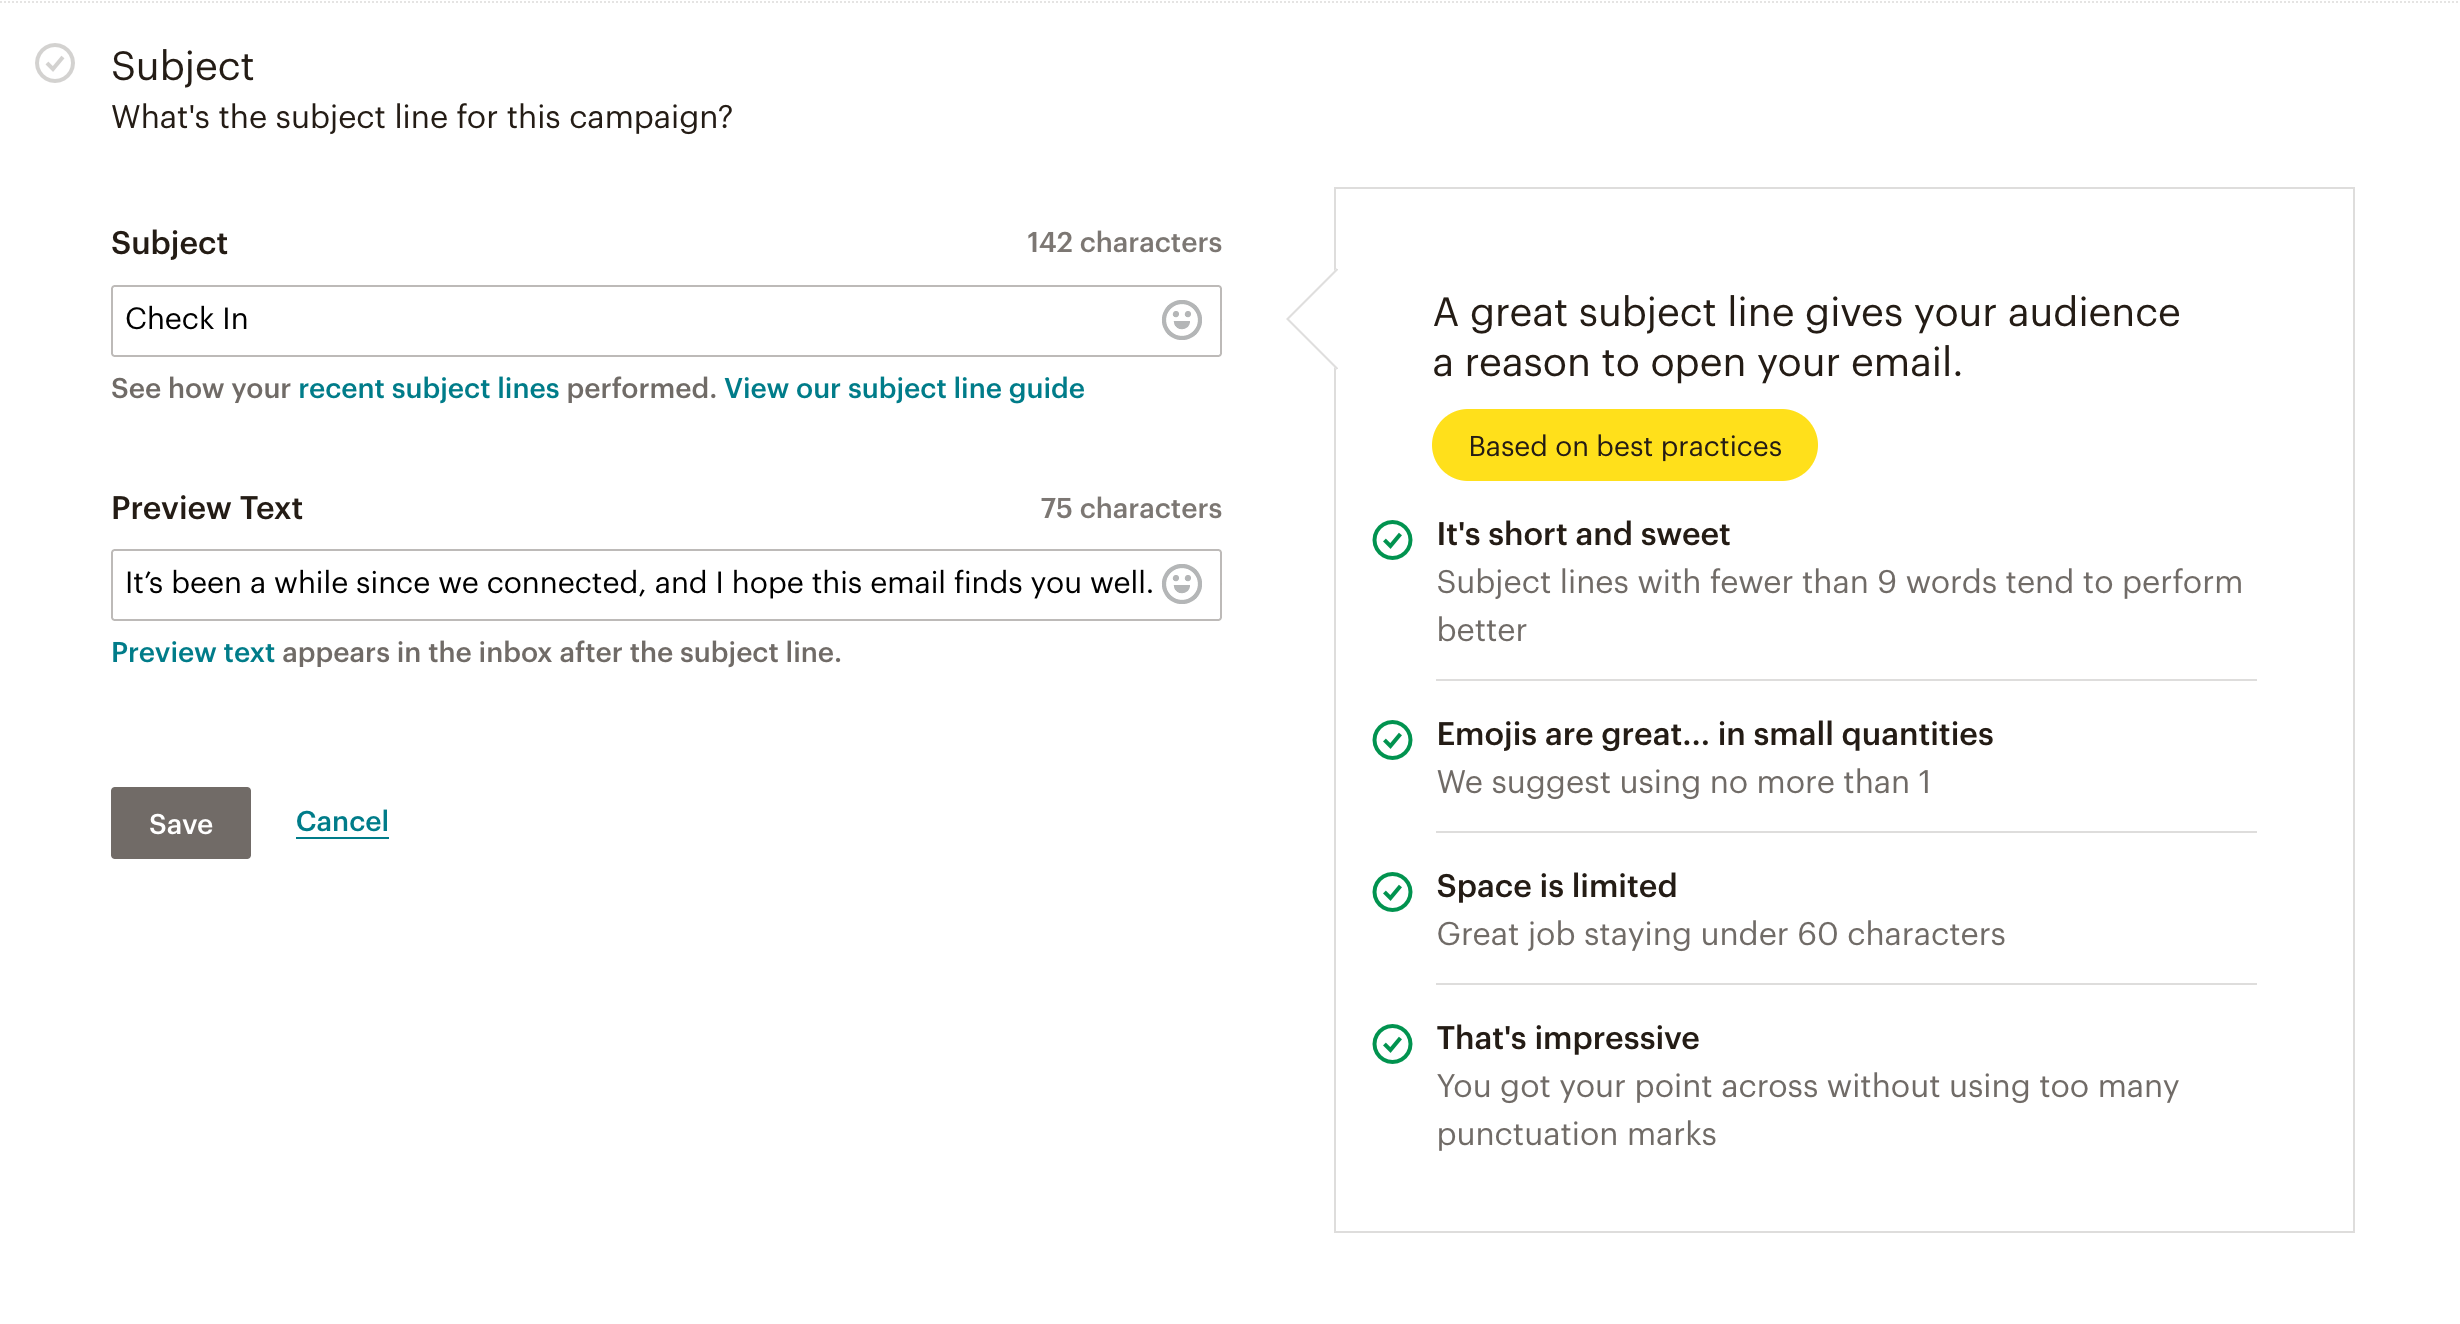
16. Type in your subject line and preview text.
17. Click “Save”.
Tip: for your sphere of influence check ins you want this to look like a personalized email rather than a mass email. For the preview, type in the first line of your email to mirror what the preview for a one-on-one email looks like.
19. Select “Design email”.

20. Choose a template, write and design your email.
21. Click “Continue” in the top right.
22. Now that your campaign is all set, click “Schedule”.

23. Click on “Delivery date” and choose the email send date from the calendar.

24. Select the “Send Time Optimization” button to auto-select the time your email will go out.

25. Click “Schedule Campaign”.
You’re all set! Repeat the steps in this section for every quarterly email, and they’ll automatically send out on your desired date.
Classic vs. New Builder
Mailchimp has recently introduced some new features, including a sleek new email builder and referral program.
The New Builder
When you go to design your next email you’ll see this pop-up:

Selecting the new builder offers a more streamlined email design experience. There’s a list of basic templates to choose from on the left-hand side of your screen. You’ll also notice that you no longer have the pre-made column designs you’re used to seeing in the classic builder.
Adding layout features
To add layout features into your email:
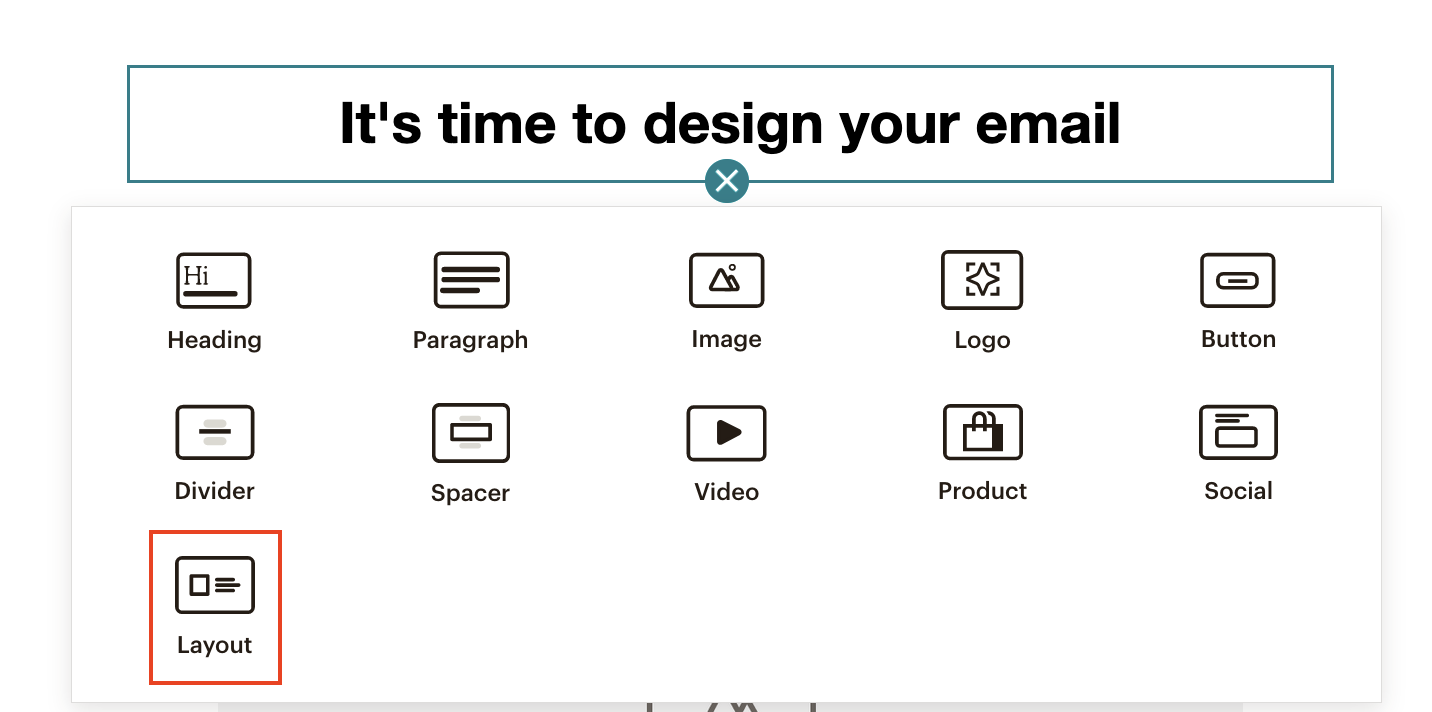
Hover over an existing section and click “+”.
Click “Layout”.
Choose your desired layout. You can use the dropdown on the right to quickly narrow your options.
Simplifying your email
If on the other hand you want to send a simple email such as this:

Delete all of the content blocks in the template except for one text content block. To delete blocks:
Click into a content block.
Select the trashcan icon.
Repeat these steps for all of the content blocks except for the text block.
Type your email into your remaining content block, and click “Continue” in the top right. You may notice that as you press enter when you’re typing, a new text content block is created each time. You can avoid this by holding down your “Shift” button as you press “Enter” or “Return” on your keyboard.
Referral program
Mailchimp now includes a “Grow your business with Mailchimp” banner at the bottom of your email.
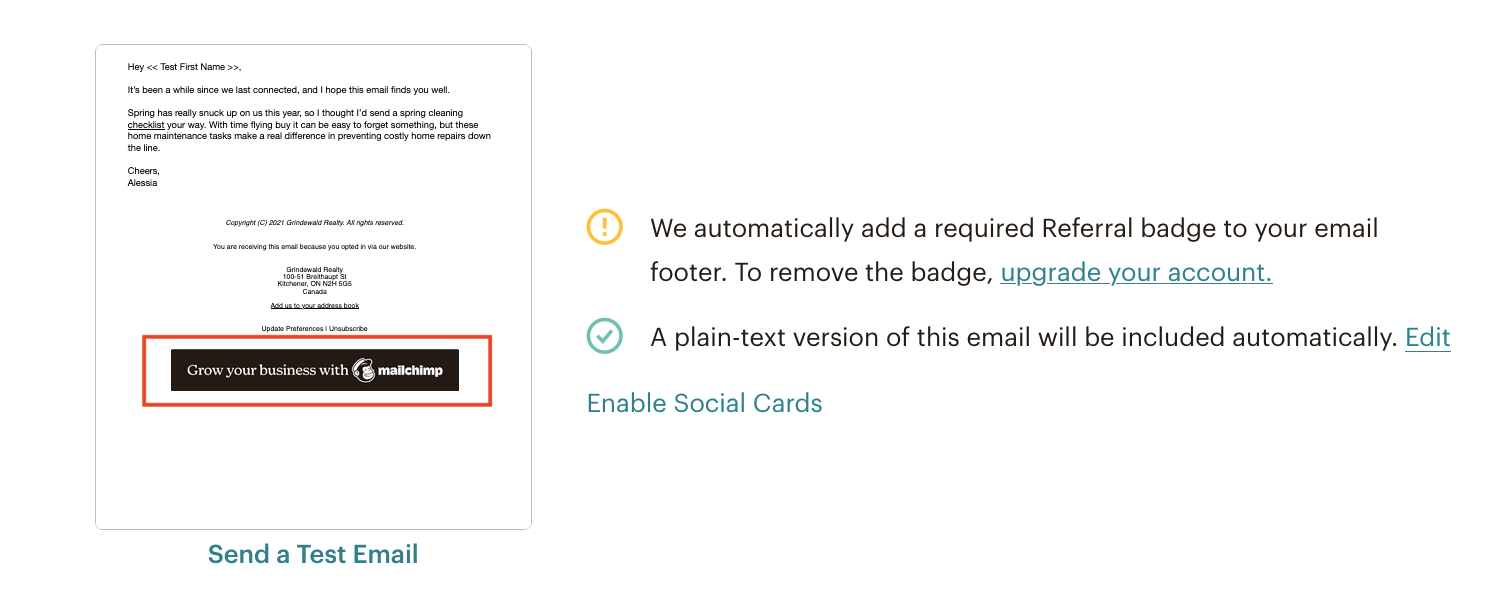
If you have a paid plan, you can remove this by following these instructions.
Final Thoughts
And there you have it! By setting up a combination of automated real estate drip marketing and scheduled campaigns, you can nurture your existing book of business and sphere of influence at the same time that you’re working to get exposure and new leads. Investing the time up-front to set up your email marketing builds the scaffolding you need for a massively productive referral-based real estate career.
Between marketing your business, juggling showings, and staying on top of your leads, you need a system to manage your workload in a stress-free and intuitive way. RealOffice360 is an unbelievably simple CRM, business tracker, and daily planner for real estate agents and Realtors®. Rather being just a data dump for client information, RealOffice360 helps you visually build your business plan, cultivate your real estate database towards your goals, and ultimately keeps you focused on what matters most: your clients and your deals. Get started for free - no credit card required!